DIY Renovations: Decluttering Tips
Before you dive into your DIY painting project, it’s smart to clear out the clutter. Getting rid of the junk not only makes the job easier but also gives your space a cleaner, more polished look. Here are some practical tips for junk removal and eco-friendly waste disposal.
Junk Removal Made Easy
Decluttering can feel like a huge task, but with the right approach, it can be manageable and even fun. Here are some tips to help you get started:
- Make a Game Plan: Start by listing the areas that need decluttering. Break it down into smaller tasks so it doesn’t feel overwhelming.
- Sort It Out: Divide your stuff into piles: keep, donate, recycle, and toss. This keeps you organized and speeds up decision-making.
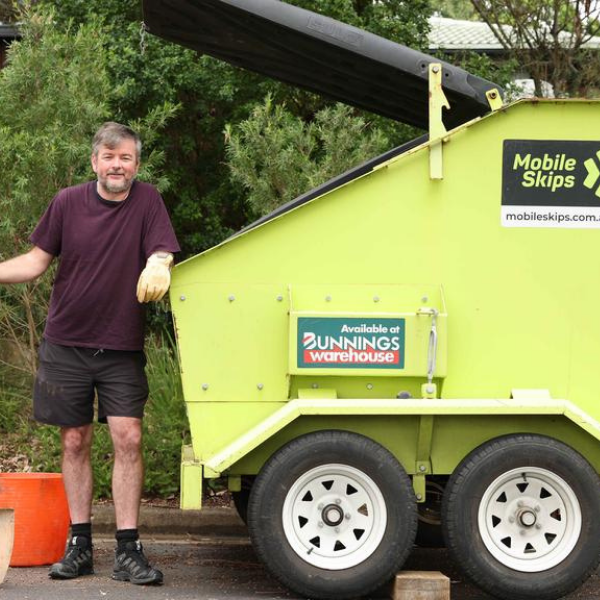
- Rent a Skip Bin: For big projects, a skip bin is a lifesaver. It’s a handy way to gather all your junk in one spot (Mobile Skips).
- Regular Clean-Ups: Make decluttering a habit. Set a monthly or quarterly schedule to keep junk from piling up again.
Go Green with Waste Disposal
Taking care of waste responsibly is good for the planet. Here are some eco-friendly options:
- Recycle: Separate recyclables like paper, glass, and plastic. Many local councils have recycling programs that make it easy.
- Donate: If it’s in good shape, donate it. Charities and thrift stores can give your unwanted items a new home and help those in need.
- Compost: Turn food scraps and garden waste into compost. It’s great for reducing landfill waste and enriching your garden soil.
- Hire the Pros: For large amounts of waste, consider a professional service. They often offer eco-friendly disposal options (Mobile Skips).
| Waste Type | Disposal Method | Benefits |
|---|---|---|
| Recyclable | Local council recycling | Reduces landfill waste |
| Donatable | Charities, thrift stores | Helps those in need |
| Organic | Composting | Creates nutrient-rich compost |
| General Waste | Skip bins, professional services | Convenient and efficient |
For more tips on decluttering and managing renovation waste, check out our articles on diy decluttering tips and diy home renovation ideas.
By following these tips, you can declutter your space efficiently and dispose of waste in an eco-friendly way, making your DIY painting project a breeze.
Essential Painting Tools for Renovations
When you’re diving into DIY painting projects, having the right gear can make all the difference. Let’s break down the must-have brushes, rollers, and drop cloths to make your renovation a breeze.
Brushes and Rollers You Need
Picking the right brushes and rollers is key to getting that pro finish. Here’s what you should have in your toolkit:
Brushes:
- 2 1/2-inch Angled Brush: Perfect for painting trim and cutting in around edges. Brands like Wooster, Purdy, and Benjamin Moore are top picks.
- Flat Brush: Great for larger, flat surfaces to ensure even coverage.
| Brush Type | Recommended Brands | Usage |
|---|---|---|
| 2 1/2-inch Angled Brush | Wooster, Purdy, Benjamin Moore | Trim and cutting in |
| Flat Brush | Wooster, Purdy | Large flat surfaces |
Rollers:
- Standard 9-inch Roller: A go-to with a synthetic core and a 3/8-inch nap. Brands like Ace and Shur-Line are solid choices.
- Mini Rollers: Ideal for tight spots and detailed work.
| Roller Type | Recommended Brands | Usage |
|---|---|---|
| Standard 9-inch Roller | Ace, Shur-Line | Large areas |
| Mini Rollers | Wooster, Purdy | Tight spaces and detail work |
Investing in quality brushes and rollers means better coverage and fewer touch-ups. Don’t forget high-end painter’s tape to keep those lines crisp and clean.
Picking the Right Drop Cloths
Drop cloths are a lifesaver, protecting your floors and furniture from paint splatters. Here’s how to choose the best ones:
- Canvas Drop Cloths: Canvas is the go-to for painting because it’s durable and stays put. Unlike plastic, it’s less slippery and more reliable. While they might cost more upfront, they’re worth it if you paint often.
| Drop Cloth Type | Material | Benefits |
|---|---|---|
| Canvas Drop Cloth | Canvas | Durable, stays in place, less slippery |
| Plastic Drop Cloth | Plastic | Cheaper, but can be slippery and less durable |
For more tips on gearing up for your painting project, check out our section on DIY home renovation tools.
By choosing the right brushes, rollers, and drop cloths, your DIY painting projects will be smoother, more efficient, and a lot more fun. Happy painting!
Safety Tips for DIY Renovations
When you’re diving into DIY painting projects, putting safety first is a no-brainer. Handling tricky materials and making sure you’ve got good ventilation and the right gear can keep you out of harm’s way.
Dealing with Hazardous Stuff
Some materials in DIY projects can be downright dangerous if you don’t handle them right. Things like asbestos, chemicals, batteries, paint, poison, food, biological waste, gas bottles, fuel, and oils shouldn’t just be tossed in the trash (Mobile Skips). Knowing how to deal with these safely is a must.
- Asbestos: Don’t even think about removing asbestos yourself. Call in the pros for this nasty stuff.
- Chemicals and Paint: Keep these in a cool, dry spot. And whatever you do, don’t mix different chemicals.
- Batteries and Fuel: Take these to a recycling center.
- Biological Waste: Use biohazard bags and follow local rules for disposal.
Ventilation and Protective Gear
Good ventilation and the right gear are your best friends during DIY painting projects.
Ventilation
When painting indoors, you need to keep the air flowing to avoid breathing in harmful fumes. Open doors and windows to let in fresh air and cut down on the risk of dizziness, headaches, or nausea from paint fumes.
| Ventilation Tips | Benefits |
|---|---|
| Open windows | Fresh air flow |
| Use fans | Better air movement |
| Take breaks | Less fume exposure |
Protective Gear
Wearing the right gear can save you from a lot of trouble.
- Respirators: If you’re using solvent-based materials, a respirator can keep you from inhaling nasty fumes (True Value).
- Dust Masks: Use one when sanding to keep particles out of your lungs. A power sander with a sawdust collection bag is a good idea too.
- Gloves: Protect your hands from paint and chemicals.
- Goggles: Keep your eyes safe from splashes and dust. If you get paint in your eyes, rinse them right away.
For more tips on DIY home renovation tools and safety, check out our articles on home renovation tips and DIY home renovation ideas.
Stick to these safety tips, and your DIY painting project will be a lot safer and smoother.
Waste Management for DIY Projects
Taking on a DIY painting project? Managing waste is key. Not only does it keep your space clean, but it also helps the environment.
Skip Bins: Your Waste Removal Buddy
Skip bins are a lifesaver for DIY waste. They come in different sizes, so pick one based on how much junk you’ll have. For example, a Standard Skip Bin (500kg) can hold about one wheelbarrow of heavy stuff, while a Heavy Skip Bin (1000kg) can handle up to five wheelbarrows.
| Skip Bin Type | Capacity (kg) | Heavy Stuff Capacity (Wheelbarrows) |
|---|---|---|
| Standard Skip Bin | 500 | 1 |
| Heavy Skip Bin | 1000 | 5 |
Heads up: some things can’t go in skip bins, like asbestos, chemicals, batteries, paint, poison, food, biological waste, gas bottles, fuel, and oils. Sort these out and follow local disposal rules.
One cool thing about Mobile Skips is you don’t need a council permit. They’re on a registered trailer, so you can park them anywhere you can park a car (Mobile Skips). Easy peasy!
Need more decluttering tips? Check out our article on diy decluttering tips.
Recycling: Do It Right
Recycling during your DIY project is a must. It cuts down on waste and helps the planet. Mobile Skips works with top waste management companies in Australia to make sure your waste is recycled properly (Mobile Skips).
Here are some recycling tips:
- Sort It Out: Separate your waste into plastics, metals, glass, and paper. This makes recycling easier.
- Reuse and Repurpose: Before you toss something, think if you can use it again. Old paint cans? Perfect for storage.
- Team Up with Recycling Centres: Many local centres take a variety of materials. Check what they accept and drop off your recyclables regularly.
Mobile Skips also partners with Carbon Neutral to plant a tree for every rubbish collection booked online, offsetting the carbon footprint at no extra cost to you (Mobile Skips).
By recycling right, you can make a big difference. For more eco-friendly renovation ideas, check out our article on budget-friendly home renovations.
Being smart about waste and recycling during your DIY project makes your home improvement efficient and green. For more tips, see our guide on diy home renovation ideas.
Getting Your Walls Ready for Painting
Want your DIY painting project to look like a pro did it? Prepping your walls is the secret sauce. Follow these steps to make sure your walls are ready for that fresh coat of paint.
Check and Clean Your Walls
First things first, give your walls a good once-over. Look for cracks, peeling paint, or any other issues. Sand down or scrape off any flaky bits to get a smooth surface.
Next, clean those walls. Dirt, grease, and mildew are your enemies here. Greasy spots might need a bit of soap and water. Make sure everything’s bone dry before you move on.
| Task | Tools Needed |
|---|---|
| Inspect walls for damage | Flashlight, scraper |
| Sand or scrape flaking paint | Sandpaper, scraper |
| Clean walls | Soap, water, sponge |
Patch Up and Prime
Once your walls are clean and dry, it’s time to fix any holes or cracks. Use a patching compound to fill them in (Home Depot). Sand the patched spots so they’re level with the rest of the wall.
After patching, slap on some primer. Primer helps the paint stick better and gives you a nice, even base. It’s super important for patched areas or spots that soak up paint like a sponge (Benjamin Moore).
| Task | Tools Needed |
|---|---|
| Patch holes and cracks | Patching compound, putty knife |
| Sand patched areas | Sandpaper |
| Apply primer | Primer, paintbrush, roller |
Get these steps right, and you’ll have a smooth, long-lasting paint job. For more tips on home renovation and DIY projects, check out our other articles.
Picking the Perfect Indoor Paint
Choosing the right paint for your DIY projects can make a huge difference in how your home looks and holds up over time. Knowing the types of indoor paint finishes and considering the environment can help you make the best choice.
Types of Indoor Paint Finishes
Different finishes give different levels of shine and durability. Here’s a quick rundown:
| Finish Type | Description | Best Used For |
|---|---|---|
| Eggshell | Low sheen, smooth finish. Washable and resists stains and scuffs. | Hallways, dining rooms, living rooms (Forbes) |
| Satin | Soft sheen, versatile, resists mildew and fading, easy to clean. | Playrooms, family rooms, kitchens, bathrooms (Forbes) |
| Latex | Eco-friendly, dries fast, easy to clean with soap and water. Less durable. | Walls and ceilings (Forbes) |
| Acrylic | More durable than latex, pricier. | Cabinets, high-use areas (Forbes) |
| Oil-Based | Durable, smooth finish, longer drying time, strong smell. Needs paint thinner for cleanup. | Floors, doors, furniture (Forbes) |
Thinking Green: Environmental Considerations
When picking paint, think about the environment too. Here’s what to keep in mind:
-
VOC Levels: Volatile Organic Compounds (VOCs) are chemicals in many paints that can harm the environment and your health. Go for low or zero-VOC paints to keep your indoor air clean.
-
Eco-Friendly Brands: Some brands focus on sustainability by using recycled materials, eco-friendly packaging, and non-toxic ingredients. Do a little research to find brands that match your green values.
-
Water-Based vs. Oil-Based: Water-based paints like latex and acrylic are usually more eco-friendly than oil-based ones. They emit fewer VOCs and can be cleaned up with soap and water, so you don’t need harsh chemicals.
For more home renovation tips and advice, check out our articles on diy bathroom renovations, diy kitchen renovations, and diy home renovations. Also, take a look at our guides on diy home renovation on a budget and diy organization ideas for more inspiration.