DIY Bathroom Renovations
Must-Have Tools for Bathroom Makeovers
Ready to tackle that bathroom renovation? Make sure you’ve got these essential tools to make your project a breeze:
- Buddy Tools Drywall Hand Tools Kit: Perfect for drywalling, this kit gives you four handy tools in one go. Check it out here.
- Pro Knees Kneepads: Save your knees while tiling. These pads are a lifesaver for anyone spending hours on the floor. More info here.
- Collomix Mixer: Mix thinset mortar like a pro. This mixer ensures your thinset is just right. Learn more here.
- Fein Turbo Dust Extractor: Keep the dust down and your lungs happy. This extractor is a must for any dusty job. Details here.
- Soft Spa Bidet Toilet Seat: Upgrade your bathroom with this luxurious bidet seat. Trust us, you won’t regret it. Find out more here.
Stay Safe While You Renovate
Safety first, folks! Here’s how to keep yourself safe during your DIY bathroom renovation:
- Wear Protective Gear: Safety goggles, gloves, and dust masks are your best friends.
- Use the Right Tools: Don’t improvise with makeshift tools. Stick to the proper ones.
- Electrical Safety: Always turn off the power when working with electrical stuff and use insulated tools.
- Ventilation: Keep the air flowing when using strong adhesives, paints, or chemicals.
- Stable Ladders and Scaffolding: Make sure your ladders and scaffolding are rock solid.
- Read Instructions: Follow the manufacturer’s guidelines for all tools and materials.
For more tips on safety and tools, check out our articles on DIY home renovation tools and home renovation tips.
| Safety Measure | Description |
|---|---|
| Protective Gear | Safety goggles, gloves, dust masks |
| Proper Tools | Using the right tools for specific tasks |
| Electrical Safety | Turning off power supply, using insulated tools |
| Proper Ventilation | Ensuring good airflow when using chemicals |
| Stable Ladders | Using stable ladders and scaffolding |
| Reading Instructions | Following manufacturer’s guidelines for tools and materials |
Stick to these safety tips, and you’ll have a safer, smoother renovation. For more DIY bathroom renovation tips, explore our resources on DIY home renovations and budget-friendly home renovations.
Waste Management in Bathroom Renovations
Handling waste right is a game-changer when you’re knee-deep in DIY bathroom renovations. Here’s how to keep things tidy and green while you transform your space.
Smart Waste Removal Tips
Keeping your project on track and your home clean is all about smart waste removal. Here’s how to do it:
-
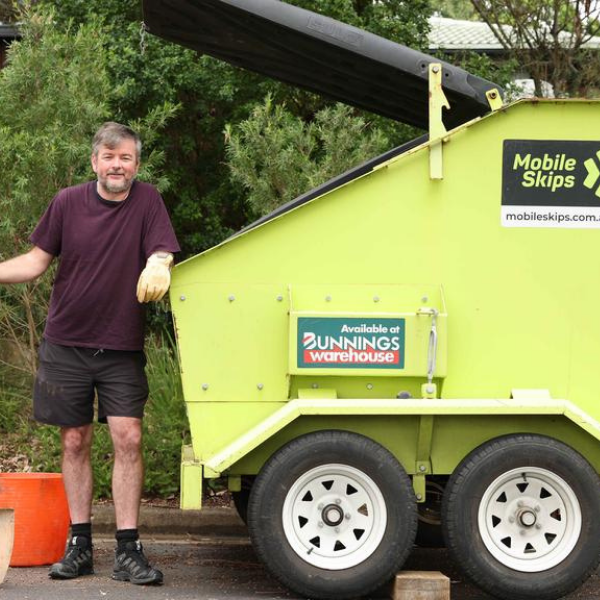
Rent a Skip Bin: A skip bin is your best friend for big messes. The Standard Skip Bin (500kg) holds about 1 wheelbarrow of heavy stuff, while the Heavy Skip Bin (1000kg) can handle up to 5 wheelbarrows.
-
Sort Your Waste: Break down your waste into recyclables, non-recyclables, and hazardous stuff. This makes it easier to dispose of and keeps recyclables from getting ruined.
-
Know What’s Not Allowed: Skip bins have their limits. Keep out asbestos, chemicals, batteries, paint, poison, food, biological waste, gas bottles, fuel, and oils (Mobile Skips).
-
Plan Regular Pickups: If your project’s a big one, schedule regular waste pickups. This keeps the mess from taking over.
Recycling Done Right
Recycling isn’t just good for the planet—it’s smart waste management. Here’s how to do it right:
-
Team Up with Pros: Mobile Skips works with top waste management companies in Australia to make sure your waste gets recycled properly (Mobile Skips).
-
Recycle Building Materials: Metals, glass, and some plastics can be recycled. Sort them out and take them to your local recycling center.
-
Donate What You Can: Got fixtures or materials still in good shape? Donate them to local charities or organizations that can put them to good use.
-
Compost Organic Waste: Wood scraps and other organic waste can be composted. This cuts down on landfill waste and gives you great compost for your garden.
| Waste Type | Disposal Method |
|---|---|
| Metals | Recycle at local recycling center |
| Glass | Recycle at local recycling center |
| Plastics | Recycle if marked recyclable |
| Organic Waste | Compost |
| Hazardous Materials | Special disposal services |
For more tips on home improvement projects, check out our articles on diy home improvement projects and home renovation tips. Smart waste management and responsible recycling keep your project organized and help the environment.
Budgeting for Bathroom Renovations
Cost-Saving Tips for Renovations
Renovating your bathroom doesn’t have to drain your wallet. With some smart strategies, you can create a luxurious retreat without going broke.
-
DIY Tasks: Save big by doing some of the work yourself. Painting, tiling, swapping out faucets, and installing light fixtures are all tasks you can handle, cutting down on labor costs (Oatey).
-
Stick to the Layout: Keeping your bathroom’s current layout can save you a ton. Moving plumbing fixtures and resizing the room are some of the priciest parts of a remodel (Oatey).
-
Refinish Fixtures: Instead of buying new fixtures, give the old ones a facelift. Change the finish or color, refinish the bathtub or shower, paint the cabinets, and spray-paint hardware to freshen up the space on the cheap (Oatey).
-
Prefabricated Options: Go for prefabricated showers or bathtubs. They’re often cheaper than custom-built ones and save on both costs and labor hours (Oatey).
-
Shop Smart: Hunt for sales, discounts, and clearance items. Buying materials and fixtures during sales can save you a bundle.
Setting a Realistic Budget
Setting a realistic budget is key to keeping your DIY bathroom renovation on track without any nasty surprises.
-
Determine Your Budget: Figure out how much you’re willing to spend. The average bathroom remodel costs around $10,000 (Oatey), but you can adjust this based on your finances.
-
Allocate Funds: Break down your budget into categories like materials, fixtures, labor (if you’re hiring pros), and a contingency fund. This helps you see where your money’s going.
-
Research Costs: Look up the costs of materials, fixtures, and tools you’ll need. This gives you a clear idea of how much each item will cost and helps you stick to your budget.
-
Prioritize: Decide what’s most important to you and allocate more funds there. If a new bathtub is a must-have, put more money towards that and less towards other areas.
| Category | Estimated Cost (AUD) |
|---|---|
| Materials (tiles, paint) | $2,000 – $4,000 |
| Fixtures (toilet, sink) | $1,500 – $3,000 |
| DIY Tools | $500 – $1,000 |
| Labor (if hiring) | $2,000 – $4,000 |
| Contingency Funds | $1,000 |
| Total Estimated Budget | $7,000 – $13,000 |
- Track Expenses: Keep an eye on your expenses throughout the renovation. This helps you stay within your budget and make adjustments if needed.
For more tips on managing your home improvement projects, check out our budget-friendly home renovations and diy home renovation blogs.
By following these cost-saving tips and setting a realistic budget, you can complete your DIY bathroom renovation without overspending. Explore our diy home renovation ideas for more inspiration and guidance.
Planning Your Bathroom Renovation
Getting your bathroom renovation right takes some solid planning. From figuring out what you want to picking out the right materials, every step counts in turning your bathroom into a cozy haven.
Setting Your Renovation Goals
Before you grab that sledgehammer, think about what you really want from this remodel. Do you want a fresh look, better functionality, or more storage? Knowing your goals will keep you on track and help you make smart choices.
Think about:
- Layout: Sticking with your current layout can save you a ton of cash. Moving plumbing or changing the room size can get pricey.
- Style: What vibe are you going for? Modern, rustic, minimalist, or something else entirely?
- Budget: How much are you willing to spend? DIY projects can cut labor costs big time. For more money-saving tips, check out our budget-friendly home renovations.
Picking Out Materials and Fixtures
Once you know what you want, it’s time to pick out the materials and fixtures. This covers everything from tiles and countertops to faucets and lights.
Materials
| Material | Average Cost (AUD) | Benefits |
|---|---|---|
| Ceramic Tiles | $30 – $50 per sqm | Tough, water-resistant |
| Porcelain Tiles | $50 – $100 per sqm | High quality, versatile designs |
| Marble | $100 – $250 per sqm | Luxurious, unique patterns |
| Laminate Countertops | $40 – $80 per sqm | Budget-friendly, easy to install |
| Granite Countertops | $200 – $400 per sqm | Durable, heat-resistant |
Fixtures
The right fixtures can make your bathroom both functional and stylish. Consider these:
- Faucets: Go for water-saving options to cut down on your water bill and help the planet.
- Lighting: Good lighting is key. LED lights are energy-efficient and bright.
- Storage Solutions: Make the most of your space with floating shelves or built-in cabinets. For more ideas, check out our diy storage renovations.
Balancing quality and cost is crucial when choosing materials and fixtures. High-quality stuff might cost more upfront, but it usually lasts longer and needs less upkeep. For more tips, visit our home renovation tips.
By setting clear goals and doing your homework on materials and fixtures, you can make sure your DIY bathroom renovation hits the mark and stays within budget. For more DIY inspiration, explore our diy home renovation ideas.
Design and Layout Tips for Your DIY Bathroom Makeover
Ready to tackle a bathroom renovation? Let’s make sure your space is both functional and stylish. Here are some practical tips to help you maximize storage and avoid common pitfalls.
Maximize Your Storage Space
One of the biggest mistakes in bathroom makeovers is skimping on storage. A cluttered bathroom can ruin your vibe and make the space feel cramped. Here’s how to keep things tidy and organized:
-
Hang Basket Shelves: Perfect for small bathrooms, these shelves are a budget-friendly way to store lotions, towels, and makeup. Just nail them to the wall, and you’re good to go. Easy access and no clutter—what’s not to love? (BHG)
-
Use Storage Containers: Keep your beauty products and essentials in DIY fabric bins. It’s a simple sewing project that frees up drawer space for those items you don’t use every day. (BHG)
-
Organize Cleaning Supplies: Dedicate a cabinet under the sink for cleaning supplies. Use tiered organizers, caddies, and even a paper towel holder to make the most of the space. (BHG)
-
DIY Pegboard Shelving: Utilize vertical space with a pegboard wall. Adjustable shelves can hold bath supplies, towels, and more. Blogger Annie Diamond added a pegboard shelf high on the wall, decorated with plants—functional and cute! (The Spruce)
Avoid These Common Renovation Mistakes
A successful bathroom renovation is all about planning and avoiding common mistakes. Here’s what to watch out for:
-
Poor Planning: Start with a solid plan. Know your goals, research materials, and set a budget. This keeps you on track and prevents costly surprises. Check out our guide on setting a realistic budget.
-
Ignoring Storage Needs: Don’t forget storage! Make sure you have enough space for all your essentials to keep the bathroom clutter-free.
-
Skipping Ventilation: Good ventilation is key to preventing mold and mildew. Make sure you have an exhaust fan or a window for airflow.
-
Bad Lighting: A well-lit bathroom is inviting and functional. Use a mix of task, ambient, and accent lighting to brighten up the space. Learn more in our diy lighting renovations.
-
Choosing the Wrong Materials: Bathrooms are humid places, so pick materials that can handle moisture. Go for water-resistant flooring, wall coverings, and fixtures.
Keep these tips in mind, and you’ll have a bathroom that’s both beautiful and practical. For more ideas and inspiration, check out our articles on diy home renovation ideas and home renovation tips.
DIY Bathroom Renovation Tips
DIY vs. Hiring Pros
Thinking about giving your bathroom a facelift? The big question is: do you roll up your sleeves or call in the experts? Both choices have their perks and pitfalls.
DIY Renovations
Doing it yourself can save you a bundle. You can handle stuff like painting, tiling, swapping out faucets, and putting up new lights. This way, you cut down on labor costs big time (Oatey). Plus, you get to work at your own pace and add your personal flair to the space.
Hiring Pros
But, if you want top-notch work, hiring a pro is the way to go. They bring skills, speed, and can tackle tricky jobs like plumbing and electrical work. Pros make sure everything’s done right, on time, and within budget, saving you from costly mistakes down the road (Tile Club).
| Aspect | DIY | Pros |
|---|---|---|
| Cost | Lower | Higher |
| Quality | Hit or Miss | Top-Notch |
| Time | Flexible | Fixed |
| Complexity | Basic | All-Inclusive |
Need more tips? Check out our article on DIY home renovation ideas.
Step-by-Step Renovation Process
Ready to dive in? Here’s a step-by-step guide to make your DIY bathroom renovation a breeze:
-
Set a Budget: Figure out how much you’re willing to spend. Include costs for materials, tools, and any pro help for the tough stuff. For budget tips, see DIY home renovation on a budget.
-
Plan the Layout: Know what you want and where you want it. Make sure the layout is practical and makes the most of your space. For more ideas, visit DIY home renovation ideas.
-
Research Materials and Fixtures: Pick durable, stylish materials that fit your budget. Choose fixtures that look good and work well.
-
Gather Tools and Supplies: Get all the tools and supplies you need before you start. Check out our guide on DIY home renovation tools.
-
Demolition: Carefully take out old fixtures, tiles, and cabinets. Follow proper waste removal practices.
-
Plumbing and Electrical Work: For complex plumbing and electrical tasks, call a pro. Messing these up can cause big problems later.
-
Install New Fixtures: Start with the big stuff like the bathtub, shower, and vanity. Make sure they’re secure and working right.
-
Tiling and Flooring: Lay down new tiles and flooring. Apply grout and sealant to keep water out.
-
Painting and Finishing Touches: Paint the walls and add the final touches like mirrors, shelves, and accessories. For painting tips, see DIY painting renovations.
-
Final Checks: Look over your work to make sure everything’s installed and working properly. Make any needed tweaks.
Follow these steps, and you’ll turn your bathroom into a cozy retreat. For more detailed guides, explore our DIY home renovation blogs.